Registration
Welcome to the Registration resource page. Here you’ll find information on registration schedules for the Fall and Spring semesters, how to register for classes through BisonHub, the Registration Guide, and other important enrollment resources.
Students are encouraged to review their registration appointment time in BisonHub and prepare in advance for enrollment periods. Check the Academic Calendar for the full list of important action items and deadlines.
Fall 2026 Registration by Earned Credits
| Day | Date | Category Eligible |
|---|---|---|
| Monday | March 23, 2026 | Seniors (90+ total earned credits) |
| Tuesday | March 24, 2026 | Juniors (60-89 total earned credits) |
| Wednesday | March 25, 2026 | Sophomores (30-59 total earned credits) |
| Thursday | March 26, 2026 | Freshmen and Unclassified (29 or fewer total earned credits) |
| Friday | March 27, 2026 | Graduate Students |
| Monday | May 18, 2026 | Incoming First-Time in College Students |
| Friday | September 4, 2026 | Last Day to Register |
| Friday | September 4, 2026 | Last Day to Add/Drop Courses |
*Refer to the Academic Calendar for a complete list of important deadlines, milestones, and required student action items.
Spring 2027 Registration by Earned Credits
| Day | Date | Category Eligible |
|---|---|---|
| Monday | October 26, 2026 | Seniors (90+ total earned credits) |
| Tuesday | October 27, 2026 | Juniors (60-89 total earned credits) |
| Wednesday | October 28, 2026 | Sophomores (30-59 total earned credits) |
| Thursday | October 29, 2026 | Freshmen and Unclassified (29 or fewer total earned credits) |
| Friday | October 30, 2026 | Graduate Students |
| Friday | January 29, 2027 | Last Day to Register |
| Friday | January 29, 2027 | Last Day to Add/Drop Courses |
*Refer to the Academic Calendar for a complete list of important deadlines, milestones, and required student action items.
For instructions on how to register, please refer to the guide below. If you have questions about your academic program, please contact your advisor for your school or current college.
Online Registration Guide
Before Registration – Plan Ahead
- Check your academic progress report.
- See what you’ve already completed and what’s still needed for your degree. Bring any questions to your advisor.
- Meet with your academic advisor.
- Your advisor will help you understand your degree requirements and create a plan that keeps you on track for graduation. Schedule an appointment and bring questions from your academic progress report audit. If you are an undergraduate student, you can locate your advisor on the Office of Undergraduate Studies Academic Advising webpage at ous.howard.edu/academic-resources/academic-advising. If you are a graduate student, you can locate your advisor in BisonHub.
- Explore your options.
- Review the semester course schedule in BisonHub and create a “wish list” of classes and backup choices. Use the Saved Schedule feature so you’re ready when registration opens.
- Clear any holds.
- Remember, financial or academic holds will prevent you from registering. Log into BisonHub, then Financials Hub to pay your balance or set up the two-month payment plan. For help, email bursarhelp@howard.edu.
- Review your financial aid package.
- Review the financial aid that has been offered to you and accept any aid not already in an “Accepted” status that you wish to be applied to your account.
- Complete any outstanding financial aid action items preventing your aid from disbursing.
- If you accept Federal Subsidized or Unsubsidized Loans, ensure all required action items are completed (such as entrance counseling or master promissory note). Make sure you complete any action items in your To-Do List (such as verification forms, loan counseling, or other required documents).
- Know your registration date and time.
- Check the “Registration Appointments” section in BisonHub and make sure you mark your calendars.
During Registration – Take Action
- Stick to your plan.
- Use your prepared schedule and backup options.
- Register right away.
- Log into BisonHub a few minutes before your time begins to secure the classes you desire.
- Join the waitlist if needed.
- If a class is full, add yourself to the waitlist to be notified if a spot opens.
- If something goes wrong, act fast.
- Check the registration troubleshooting console in BisonHub. If you have questions about the errors you receive, reach out to your academic advisor for help.
After Registration – Follow Up
- Review your schedule.
- Make sure everything looks correct and note the add/drop deadlines.
- Adjust your course load if needed.
- If your schedule feels too heavy, you can make changes until the end of the add/drop period.
- Review your student activity.
- The semesters charges will be posted on Bison Hub for your review and to act if needed. Adding or dropping classes could change your balance.
- Think ahead.
- Keep a record of the courses you’ve taken so you can plan future semesters.
Resources
Guidance
Beginning in April 2024, registration for the Fall 2024 semester, and forward, will occur in our new student information system, BisonHub. Below are guides to assist with registering in that system:
- Find Course Sections (PDF)
- Register for Courses (PDF)
- View Course Section Details (PDF)
*More information and guides about BisonHub can be found in Canvas Learning, ‘BisonHub 101’.
Academic Advising
All students are highly encouraged to consult with their academic advisor prior to completing course registration.
Please access the link below to view information on the school or college to which you have been admitted, as indicated on your letter of acceptance from the Office of Admission or approved intra-university/major change form from the Office of the Registrar. Your academic advisor will be able to inform you on which courses to select, how to register for them.
Incoming undergraduate students are encouraged to view the New Student Orientation website for details on advising and course registration. The Undergraduate Advising List contains the main points of contact for the student affairs/advising unit for each undergraduate school/college. Juniors and seniors generally receive advising assistance from their major/departmental advisor.
*Note: The Office of the Registrar does not provide academic advising services.
Course Waitlist
When a section of a course fills to the enrollment limit, students attempting to register through BisonHub will receive a registration error message that a waitlist exists. The student will then be given the option of adding themselves to the waitlist for the course, if a waitlist is available. If a student already enrolled in the course should drop, that seat will not become available for registration through BisonHub if there is an active waitlist for the course.
Students must attempt to register for the course via BisonHub in order to be offered the waitlist option. When a seat becomes available, the first student on the waitlist will receive an email notification to their Howard email address.
A student will have twelve (12) hours from the time of the email to register for the class through BisonHub. It is the student's responsibility to check their email once on a waitlist. If they do not register for the class during that time period, the seat will be offered to the next student on the waitlist.
Students MUST have an email address on file (see the Contact tab in BisonHub) or they will not receive the notification and lose their opportunity to register. Obtaining a space on a waitlist should not be interpreted as a guarantee of getting a seat in the course.
*Please also note, the course waitlist option is no longer available once a given semester has commenced. All students are encouraged to register for alternate course options with the assistance of their assigned academic advisor.
Additional Resources
Quick Reference Guide (PDF) - Highlights the BisonHub landing and keys for navigation.
BisonHub – Student Reference Guide (PDF) - The most common FAQs and links to supporting job aids and videos.
BisonHub101 - BisonHub 101 is a comprehensive training guide for students to fully utilize and become familiar with BisonHub.
BisonHub Website - For all things BisonHub - Find the latest updates and information about BisonHub including FAQs, training information, and resources guides.
Registration Troubleshooting
BisonHub Registration Troubleshooting
When attempting to register for courses via BisonHub, students may encounter errors that prevent registration. Restrictions have been applied to courses for various academic and administrative reasons.
Unfortunately, the Office of the Registrar cannot assist in resolving most registration error messages. In general, students should consult with the advising unit of their school/college for assistance with navigating the registration process.
Please see the following registration common issues that can be encountered that may hinder registration and how to resolve them BisonHub Troubleshooting Registration Issues (PDF)
If you have any questions about BisonHub, please contact the respective academic advisor
for your school or college.
Course Registration Troubleshooting
If you encounter any issues or have questions about registering for specific courses, please contact your Academic Advisor. Utilize the BisonHub – Student Reference Guide - (PDF) as a resource for accessing job aids and videos to assist you with navigating BisonHub.
Student Holds
Have A Hold On Your Account?
Review any holds on your account to ensure you have cleared any holds that impact your ability to register.
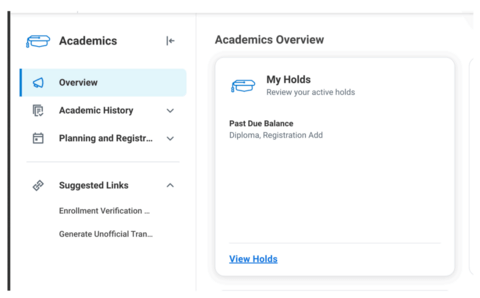
Below you will find a sample screenshot of where you can view your holds if applicable and where you can determine those that impact course registration. When you click on "View Holds" you will find resolution instructions related to any hold on your account. The past due balance hold is the hold that students are most likely to have that will prevent registration for a future term.
If you have an outstanding balance, please make payment in BisonHub to bring your past due balance below $5,000 as soon as possible to ensure that you can register when your registration appointment time arrives.
If you have questions or need assistance regarding resolving your past due balance hold, please contact bursarhelp@howard.edu or visit:
- Office of the Bursar, Suite 218 of the Administration Building
- 10:00am - 4:00pm ET
Review the guide below to find if you have a hold on your account and how to resolve it: Holds on Student Record (PDF)
Contacts
See contact information for various offices:
- Admission (Undergraduate Student) - admission@howard.edu
- Admission (Graduate Student) - hugsadmission@howard.edu
- Bursar - bursarhelp@howard.edu
- Deans - the Dean of your school/college
- Financial Aid - finaid@howard.edu
- International Student - pugbong@howard.edu or rachel.berlin@howard.edu
- Medical - studenthealthforms@howard.edu
- Residence Life - HUreslife@howard.edu
- SFS (Collections, Balance Due, Student Accounts) - bursarhelp@howard.edu
- Student Affairs - studentaffairs@howard.edu
- Student Conduct - StudentConduct@howard.edu